
In Response to Kathleen Fasanella
Kathleen Fasanella has a blog called "Fashion-Incubator", which I sometimes read. Yesterday, I saw a post that made the wheels in my head grind a bit. Since I couldn't figure out how to interact with her post without using sketches, I'm interacting with it here, instead of the comment section of her blog. If you want to have the slightest idea what this post is about, you should go read hers first. Her post is about curving the center front and center back lines, as opposed to leaving them straight, but that's a simplification, so you really should read the post first.
First, my disclaimer. I'm a hobbyist only, at this point, and I've never been professionally trained in pattern drafting. So maybe I'm all washed up; but here's my two cents anyway. Read at your own risk. ;) Oh, and also that I am no where near an artist, so if my drawings look like they've been done by two year-olds, I'll hire my six-year old brother to draw anything else I need drawn in the future!
It's going to take me awhile to get to my main point, so please be patient with me.
The first thing she addresses in her post is the center back seam, so I'll start there, too. (First I must point out a few minor differences. In her "A" picture, she has a back block with a completely vertical center back seam, and a dart in the middle of the shoulder. My drafting book {and there are many ways to draft} instructs a slightly diagonal center back seam, and a dart next to the shoulder, which can then be moved to the center of the shoulder if desired. I drew my sketch accordingly, partly because that's what I'm familiar with, and partly because I think it helps illustrate my point better.)
Now, the center back seam in my final sketch in this series looks similar to the center back line in her "B" picture. What I did was move the darts to the center back line; the dotted lines represent where the center line used to be. What this means is that the final sketch has a curved center back, but no darts. (Due to the unending flexiblity that Blogger offers, some of the following pictures will appear too small, and some too big. You may not be able to see the details of some of them unless you click on them, which opens up a larger version in a new window.)

In Kathleen's "B" sketch, the center back is curved, and there are darts. What I think is happening there is that the extra fabric is being split; some is being taken away by darts, and some by side shaping. Here's a sketch to show what I mean:

The darts are cut in half, and half the dart is taken from the side seams. The first sketch shows the shoulder dart being divided. In the second sketch, the dotted lines show where the center back line used to be, as well as how big the shoulder dart used to be. The waist dart is also divided. In the last sketch, the dotted lines show where the center back used to be, and how big the waist dart used to be. My final sketch (sans dotted lines) looks quite a bit like her "B" sketch. (Except that hers was drawn better.)
Her next set of sketches involve the bodice front. Basically, to paraphrase (but please read her post; I don't want to misrepresent her), she holds that the center front line needs to curved as well, in order to keep the neck-line from gaping. She holds this is particularly important for people with "egg-shaped" chests. (What I call having a "deeper front to back" chest, which I believe I do.)
This is the problem I believe she's trying to address (I may have misunderstood her).
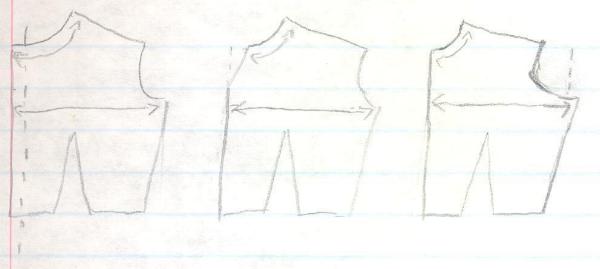
Okay. In my first sketch, I show my best attempt of a typical bodice front. Those of us with rounder ribcages (or egg-shaped, if you prefer) often run into the problem that once we get enough room for our rib-cages, the neck is much too wide. The long arrow in my first sketch represents 1/2 of the front bust measurement--in my case, 9 3/4", which is what I'll use. The curved arrow is the neck measurement of the typical bodice--I'm going to make up a convenient number and call it 4 3/4". Now, if I wanted to get the neckline small enough to match mine--3 3/4"--I could whack a whole inch of the center front (dotted line). However, then the bust line would also loose an inch, leaving it 1 inch much too snug! Bad fix. Very bad fix.
In the second sketch, I represent my understanding of Kathleen's fix--slanting (in essence, a dart) the top part of the center front line. This shortens the neck line down to what I need, and it also leaves the bust measurement intact.
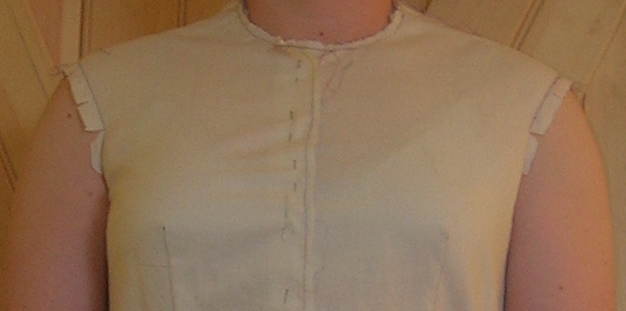
In the final sketch, I show my fix. My fix is to not mess around with altering pre-drafted patterns, but draft one to my own measurements. In this fix, the neckline is only 3 3/4. The extra inch of fabric isn't at the center, but at the side, underneath the arm. So in this fix, the center front line is still straight, and both measurements are in agreement. This is the one part of my post I can stand firmly on my own experience. This is a close up shot of the neckline of the sloper I just cut out last week. I'm not claiming my sloper is perfect, but it does have an absolutely straight center front seam, and it certainly does not gape at the neck. The fit is quite snug.

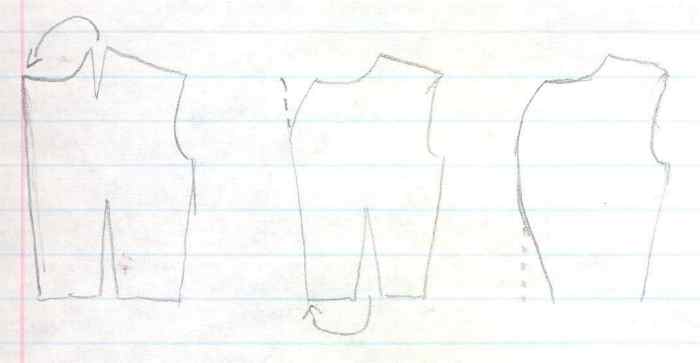
Kathleen uses several examples of princess lines (and, incidentally, just did a whole post on princess seams). All of her pictures of various methods of princess seams intrigued me, as none of them were the way I understand to make princess seams. (As I mentioned before, there are a lot of different drafting methods.) Here's a sketch to illustrate how I understand princess seams to be made:

In the first sketch, I show what my bodice front looks like before I move any darts. European Cut has you draft two bodice darts, one ending on the waist, and one ending right underneath the armpit. Before you sew up a muslin sample, you are instructed to move combine the two darts. You slash open the waist dart, and close the upper dart, as shown in my second sketch. In the second sketch I also show a dotted line for where we will open up a new dart. If we cut along that dotted line, and move half the width of the waist dart into that cut (by rotating the rest of the bodice side), we get my third sketch. Two mostly vertical darts, meeting at the bust point. The dotted line shows where the old dart used to be. As you can see, this is now basically a princess seam. Both halves need to be gently rounded and trued, but the basic shape is there. This how I understand to get a pattern line that follows the silhouette of the body, as you can see in the fourth sketch. (I don't know how this method of getting a princess seamed pattern measures up to other methods; perhaps there are flaws with it that are unknown to me.)
The point of this example is to show that a princess seamed bodice is just a bodice with invisible darts. Another example of an invisible dart is the shoulder seam; both seams are slanted, even though they look straight when sewn up.
 No one thinks of sewing a "dart" into the shoulder seam, but basically that's what it is. If you were cutting the front and back out of the same piece of fabric, the shoulder would have a big dart running from neck to shoulder point in order to get the fabric to lie neatly across the slanted shoulder.
In essence, I think that she is making a false distinction to say that we must have both a curved center line and darts. You can have both; this is a perfectly valid solution. But you can also have only all darts, or only all curved sides seams. In the end, they're the same thing. A curved side seam is just darts that have been moved to the side. Medieval dresses were often closely fitting and without darts--only a center and sides seams. I imagine a pattern for a bodice front would look like this:
 The darts "were" there. They were simply moved to the side and center seams. It's like saying you need to have pleats and gathers. You can have pleats and gathers. You can also have just pleats, or just gathers. They accomplish the same goal (removing fullness) but in different ways.
She says you need to have either a curved front seam or princess seams. I think that a curved front = princess seams = bodice darts, which can be rotated into one dart, bust to waist. If you can make the conversion one way, you can make the reverse conversion.
Not only is having a curved center seam as well as darts acceptable, it may very well be a better solution for, as an example, women with large busts. If all of the fabric take up was gathered into one dart, it would make for one very big dart, which would be hard to sew without it looking very pointy (not a good look). Splitting up the fabric fullness into a dart and the center seam could reduce the dart without reducing the shaping.
So while I agree that Kathleen's solution is valid, I don't think that it is necessary for everyone in order to get a good fit.
First, my disclaimer. I'm a hobbyist only, at this point, and I've never been professionally trained in pattern drafting. So maybe I'm all washed up; but here's my two cents anyway. Read at your own risk. ;) Oh, and also that I am no where near an artist, so if my drawings look like they've been done by two year-olds, I'll hire my six-year old brother to draw anything else I need drawn in the future!
It's going to take me awhile to get to my main point, so please be patient with me.
The first thing she addresses in her post is the center back seam, so I'll start there, too. (First I must point out a few minor differences. In her "A" picture, she has a back block with a completely vertical center back seam, and a dart in the middle of the shoulder. My drafting book {and there are many ways to draft} instructs a slightly diagonal center back seam, and a dart next to the shoulder, which can then be moved to the center of the shoulder if desired. I drew my sketch accordingly, partly because that's what I'm familiar with, and partly because I think it helps illustrate my point better.)
Now, the center back seam in my final sketch in this series looks similar to the center back line in her "B" picture. What I did was move the darts to the center back line; the dotted lines represent where the center line used to be. What this means is that the final sketch has a curved center back, but no darts. (Due to the unending flexiblity that Blogger offers, some of the following pictures will appear too small, and some too big. You may not be able to see the details of some of them unless you click on them, which opens up a larger version in a new window.)
In Kathleen's "B" sketch, the center back is curved, and there are darts. What I think is happening there is that the extra fabric is being split; some is being taken away by darts, and some by side shaping. Here's a sketch to show what I mean:

The darts are cut in half, and half the dart is taken from the side seams. The first sketch shows the shoulder dart being divided. In the second sketch, the dotted lines show where the center back line used to be, as well as how big the shoulder dart used to be. The waist dart is also divided. In the last sketch, the dotted lines show where the center back used to be, and how big the waist dart used to be. My final sketch (sans dotted lines) looks quite a bit like her "B" sketch. (Except that hers was drawn better.)
Her next set of sketches involve the bodice front. Basically, to paraphrase (but please read her post; I don't want to misrepresent her), she holds that the center front line needs to curved as well, in order to keep the neck-line from gaping. She holds this is particularly important for people with "egg-shaped" chests. (What I call having a "deeper front to back" chest, which I believe I do.)
This is the problem I believe she's trying to address (I may have misunderstood her).

Okay. In my first sketch, I show my best attempt of a typical bodice front. Those of us with rounder ribcages (or egg-shaped, if you prefer) often run into the problem that once we get enough room for our rib-cages, the neck is much too wide. The long arrow in my first sketch represents 1/2 of the front bust measurement--in my case, 9 3/4", which is what I'll use. The curved arrow is the neck measurement of the typical bodice--I'm going to make up a convenient number and call it 4 3/4". Now, if I wanted to get the neckline small enough to match mine--3 3/4"--I could whack a whole inch of the center front (dotted line). However, then the bust line would also loose an inch, leaving it 1 inch much too snug! Bad fix. Very bad fix.
In the second sketch, I represent my understanding of Kathleen's fix--slanting (in essence, a dart) the top part of the center front line. This shortens the neck line down to what I need, and it also leaves the bust measurement intact.
In the final sketch, I show my fix. My fix is to not mess around with altering pre-drafted patterns, but draft one to my own measurements. In this fix, the neckline is only 3 3/4. The extra inch of fabric isn't at the center, but at the side, underneath the arm. So in this fix, the center front line is still straight, and both measurements are in agreement. This is the one part of my post I can stand firmly on my own experience. This is a close up shot of the neckline of the sloper I just cut out last week. I'm not claiming my sloper is perfect, but it does have an absolutely straight center front seam, and it certainly does not gape at the neck. The fit is quite snug.
Kathleen uses several examples of princess lines (and, incidentally, just did a whole post on princess seams). All of her pictures of various methods of princess seams intrigued me, as none of them were the way I understand to make princess seams. (As I mentioned before, there are a lot of different drafting methods.) Here's a sketch to illustrate how I understand princess seams to be made:

In the first sketch, I show what my bodice front looks like before I move any darts. European Cut has you draft two bodice darts, one ending on the waist, and one ending right underneath the armpit. Before you sew up a muslin sample, you are instructed to move combine the two darts. You slash open the waist dart, and close the upper dart, as shown in my second sketch. In the second sketch I also show a dotted line for where we will open up a new dart. If we cut along that dotted line, and move half the width of the waist dart into that cut (by rotating the rest of the bodice side), we get my third sketch. Two mostly vertical darts, meeting at the bust point. The dotted line shows where the old dart used to be. As you can see, this is now basically a princess seam. Both halves need to be gently rounded and trued, but the basic shape is there. This how I understand to get a pattern line that follows the silhouette of the body, as you can see in the fourth sketch. (I don't know how this method of getting a princess seamed pattern measures up to other methods; perhaps there are flaws with it that are unknown to me.)
The point of this example is to show that a princess seamed bodice is just a bodice with invisible darts. Another example of an invisible dart is the shoulder seam; both seams are slanted, even though they look straight when sewn up.
 No one thinks of sewing a "dart" into the shoulder seam, but basically that's what it is. If you were cutting the front and back out of the same piece of fabric, the shoulder would have a big dart running from neck to shoulder point in order to get the fabric to lie neatly across the slanted shoulder.
In essence, I think that she is making a false distinction to say that we must have both a curved center line and darts. You can have both; this is a perfectly valid solution. But you can also have only all darts, or only all curved sides seams. In the end, they're the same thing. A curved side seam is just darts that have been moved to the side. Medieval dresses were often closely fitting and without darts--only a center and sides seams. I imagine a pattern for a bodice front would look like this:
 The darts "were" there. They were simply moved to the side and center seams. It's like saying you need to have pleats and gathers. You can have pleats and gathers. You can also have just pleats, or just gathers. They accomplish the same goal (removing fullness) but in different ways.
She says you need to have either a curved front seam or princess seams. I think that a curved front = princess seams = bodice darts, which can be rotated into one dart, bust to waist. If you can make the conversion one way, you can make the reverse conversion.
Not only is having a curved center seam as well as darts acceptable, it may very well be a better solution for, as an example, women with large busts. If all of the fabric take up was gathered into one dart, it would make for one very big dart, which would be hard to sew without it looking very pointy (not a good look). Splitting up the fabric fullness into a dart and the center seam could reduce the dart without reducing the shaping.
So while I agree that Kathleen's solution is valid, I don't think that it is necessary for everyone in order to get a good fit.
posted by Tatterdemalion | 12:20 PM
![]()
6 Comments:
Your sloper does fit quite nicely--I've never had problems fitting various bodies with a straight center seam--and i agree that it could be considered just another dart. The only thing about moving darts is that all placements are not equal--darts do work best when they are in direct relation to the bump the fabric is being shaped over. Often moving a dart means that the fit has to be fiddled with to make the new dart placement work. It also seems like making the center front curved might bring the fabric closer to the body between the breasts--for small busted women that might work but for larger ladies that might look odd unless it's a style choice.
Also for large busted women two or three darts is a good alternative to one very large dart or even moving the "dart" to the center front seam.
Alison,
I'm sorry, I didn't even realize there was a forum before!
Anonymous,
Not being large busted myself, I'm afraid I'm mostly guessing when I refer to what may or may not work well for them.
I've never even experimented with curving the center front, so I don't know how it works out, in fact. I confess to say this is mostly just a post on theory as I understand it; most of it isn't from experience. I was glad to hear your thoughts on darts. Thanks for commmenting!
(And thank you for the compliment on my sloper!)
Hi Tatter
Much of what I wrote in my post presumed readers were advanced and knew the basics, so I skipped over much of what you wrote. I really don't do beginner's stuff. Similarly, I couldn't possibly incorporate the entire range of drafting possibilities; there's an endless repertoire of possible dart placement.
I wish you the best in your continued study of drafting.
Thank you for your well-wishing. . .
All this works well unless you need your cf to be on the fold, then you need to put in darts, or invisible darts at another location.
Robyn, I'm not quite sure what you're refering to when you say "all of this". Curving the center front seam? In that case, my whole point was that the center front seam didn't need to be curved in order for things to fit.
Kathleen Fasanella was arguing that you did need to curve the center front seam; but if you were responding to her, it would be easier to communicate with her if you posted on her blog. I don't really think she spends much (any?) time hanging around here.
At any rate, thanks for stopping by, and I'm glad you commented.
Post a Comment
<< Home